Remote Access Service
The Remote Access Service is used to setup a dynamic, on-demand VPN connection between the workstation of an EC user and one or more devices connected via the Messaging Service to the same account of the user. Establishing a temporary ssh connection from the user workstation to the device or opening the device web console from the user workstation require a Remote Access Service instance. To let devices and users of an account connect through the Remote Access Service instance, the account must be assigned to the instance. The assignment is done in two modes depending on the level of the account in the account hierarchy. For the following accounts the assignment must be done explicitly by the platform administrators:
- The root account (ec-sys)
- The level-one child accounts (the children of the root account)
For all the other accounts the assignment is automatically inherited from the ancestor account; the assignment cannot be done manually. This means that all the account offspring of a level-one account share the same Remote Access Service instance.
Missing to assign the account with its Remote Access service will prevent devices and user workstations of that account to establish a VPN connection with every existing remote access service.
Create a new Remote Access Service
Each Remote Access Service instance has an EC representation and an infrastructure counter-part. Infrastructure side follow the steps at Installation and Scaling to create a new ec-vpn service deployment.
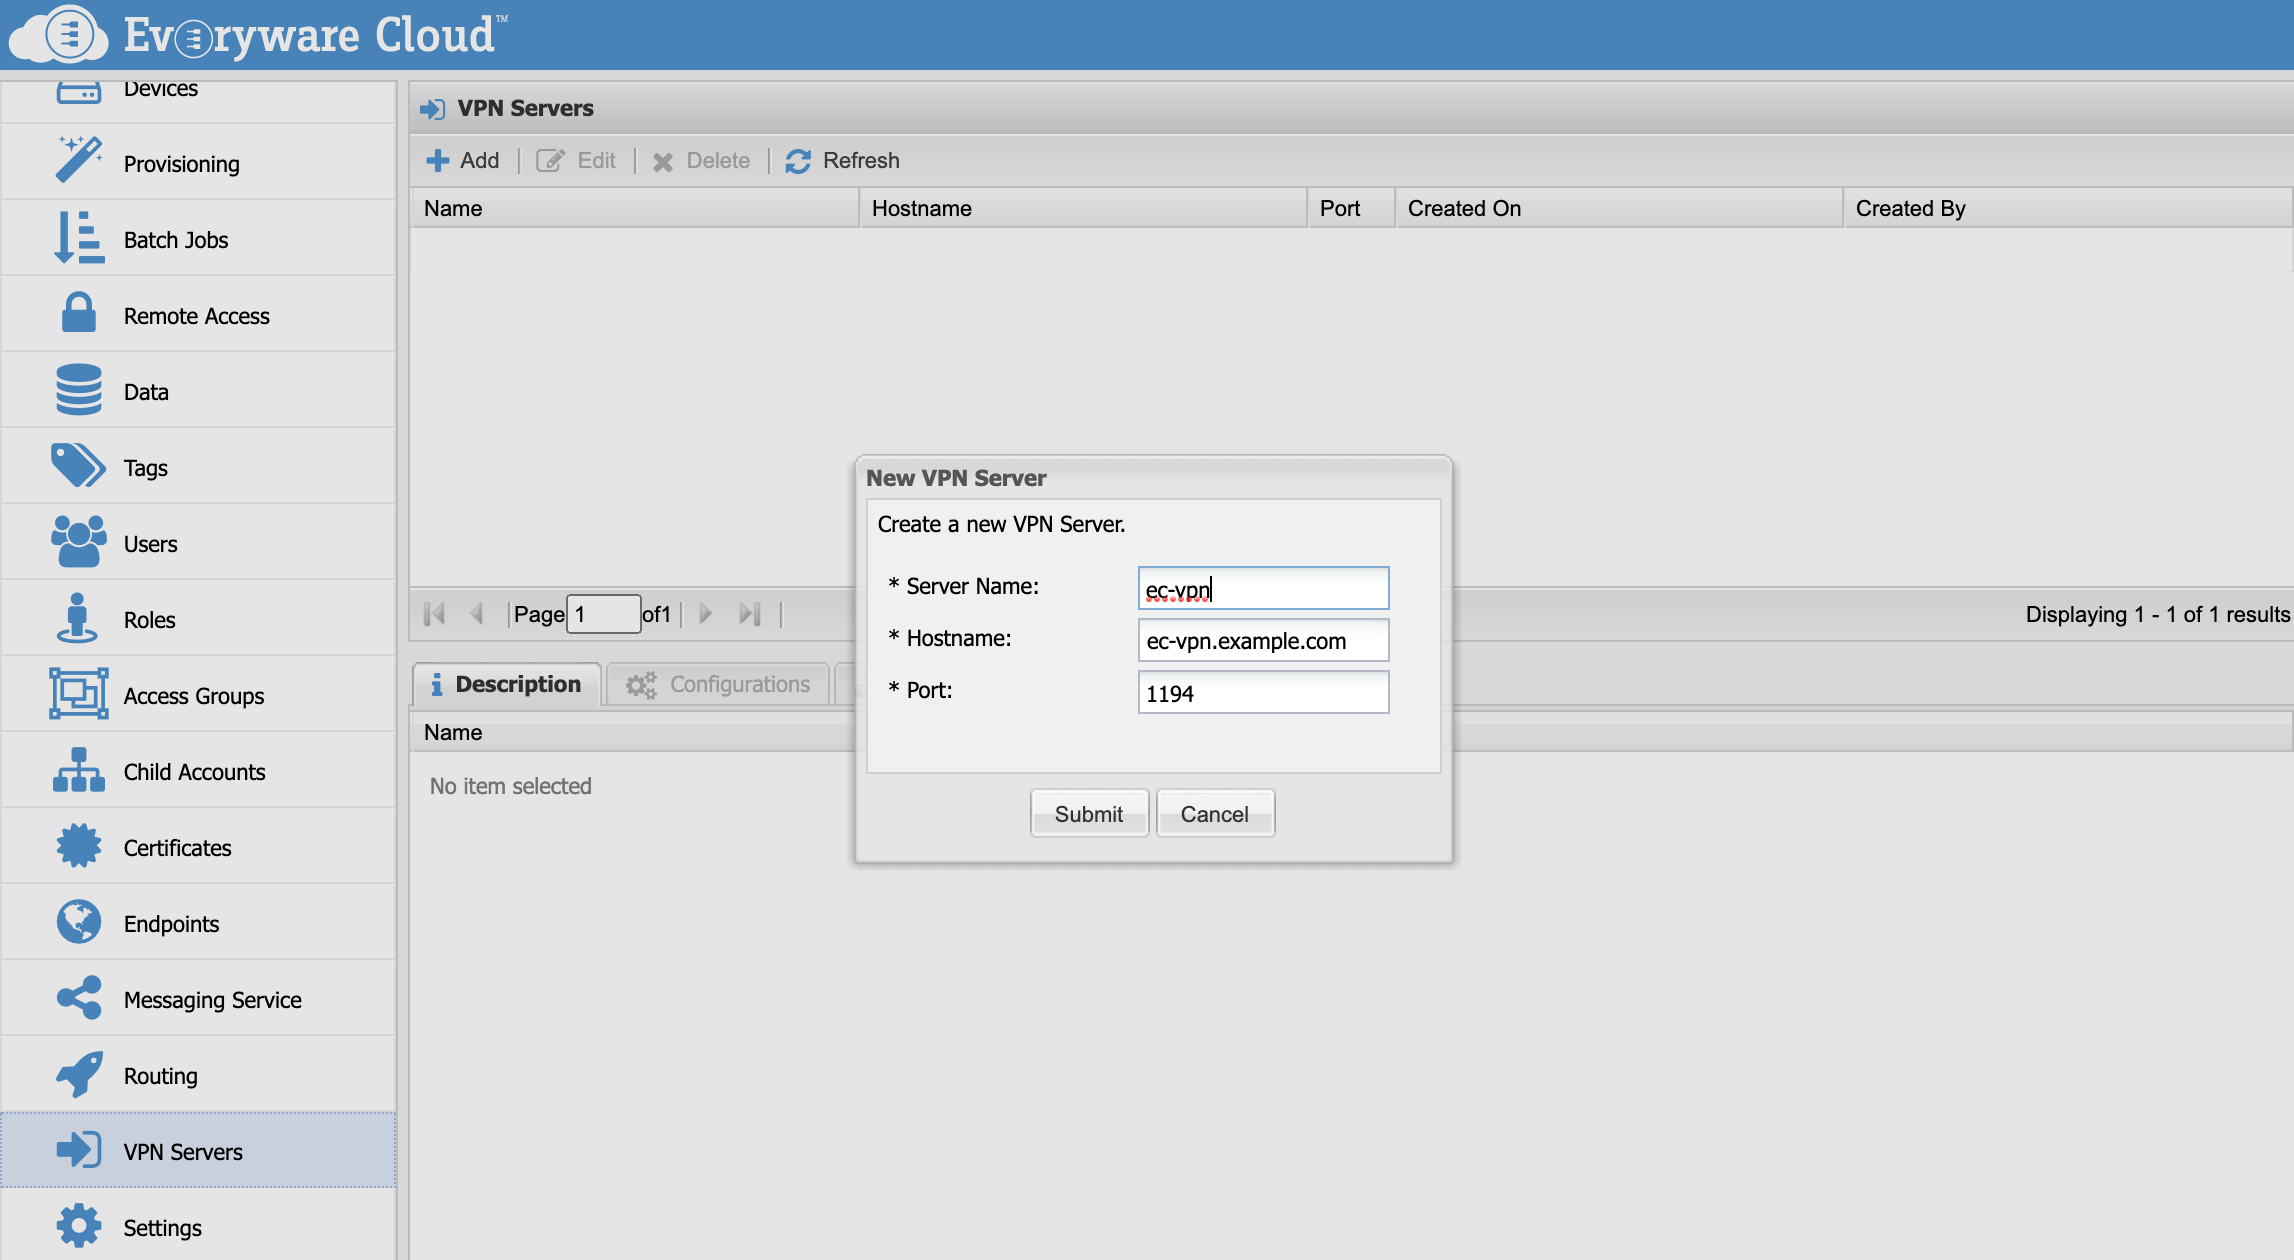
Then, login to Everyware Cloud console and navigate to the VPN Servers panel. Create a new server and specify its name (which must match the name assigned to the new service in the infrastructure), the external DNS or IP address of the service and the port.

Server Name
Server name must match the name of the VPN Service assigned at deployment time. Check the documentation at Workload Partitioning for more details.
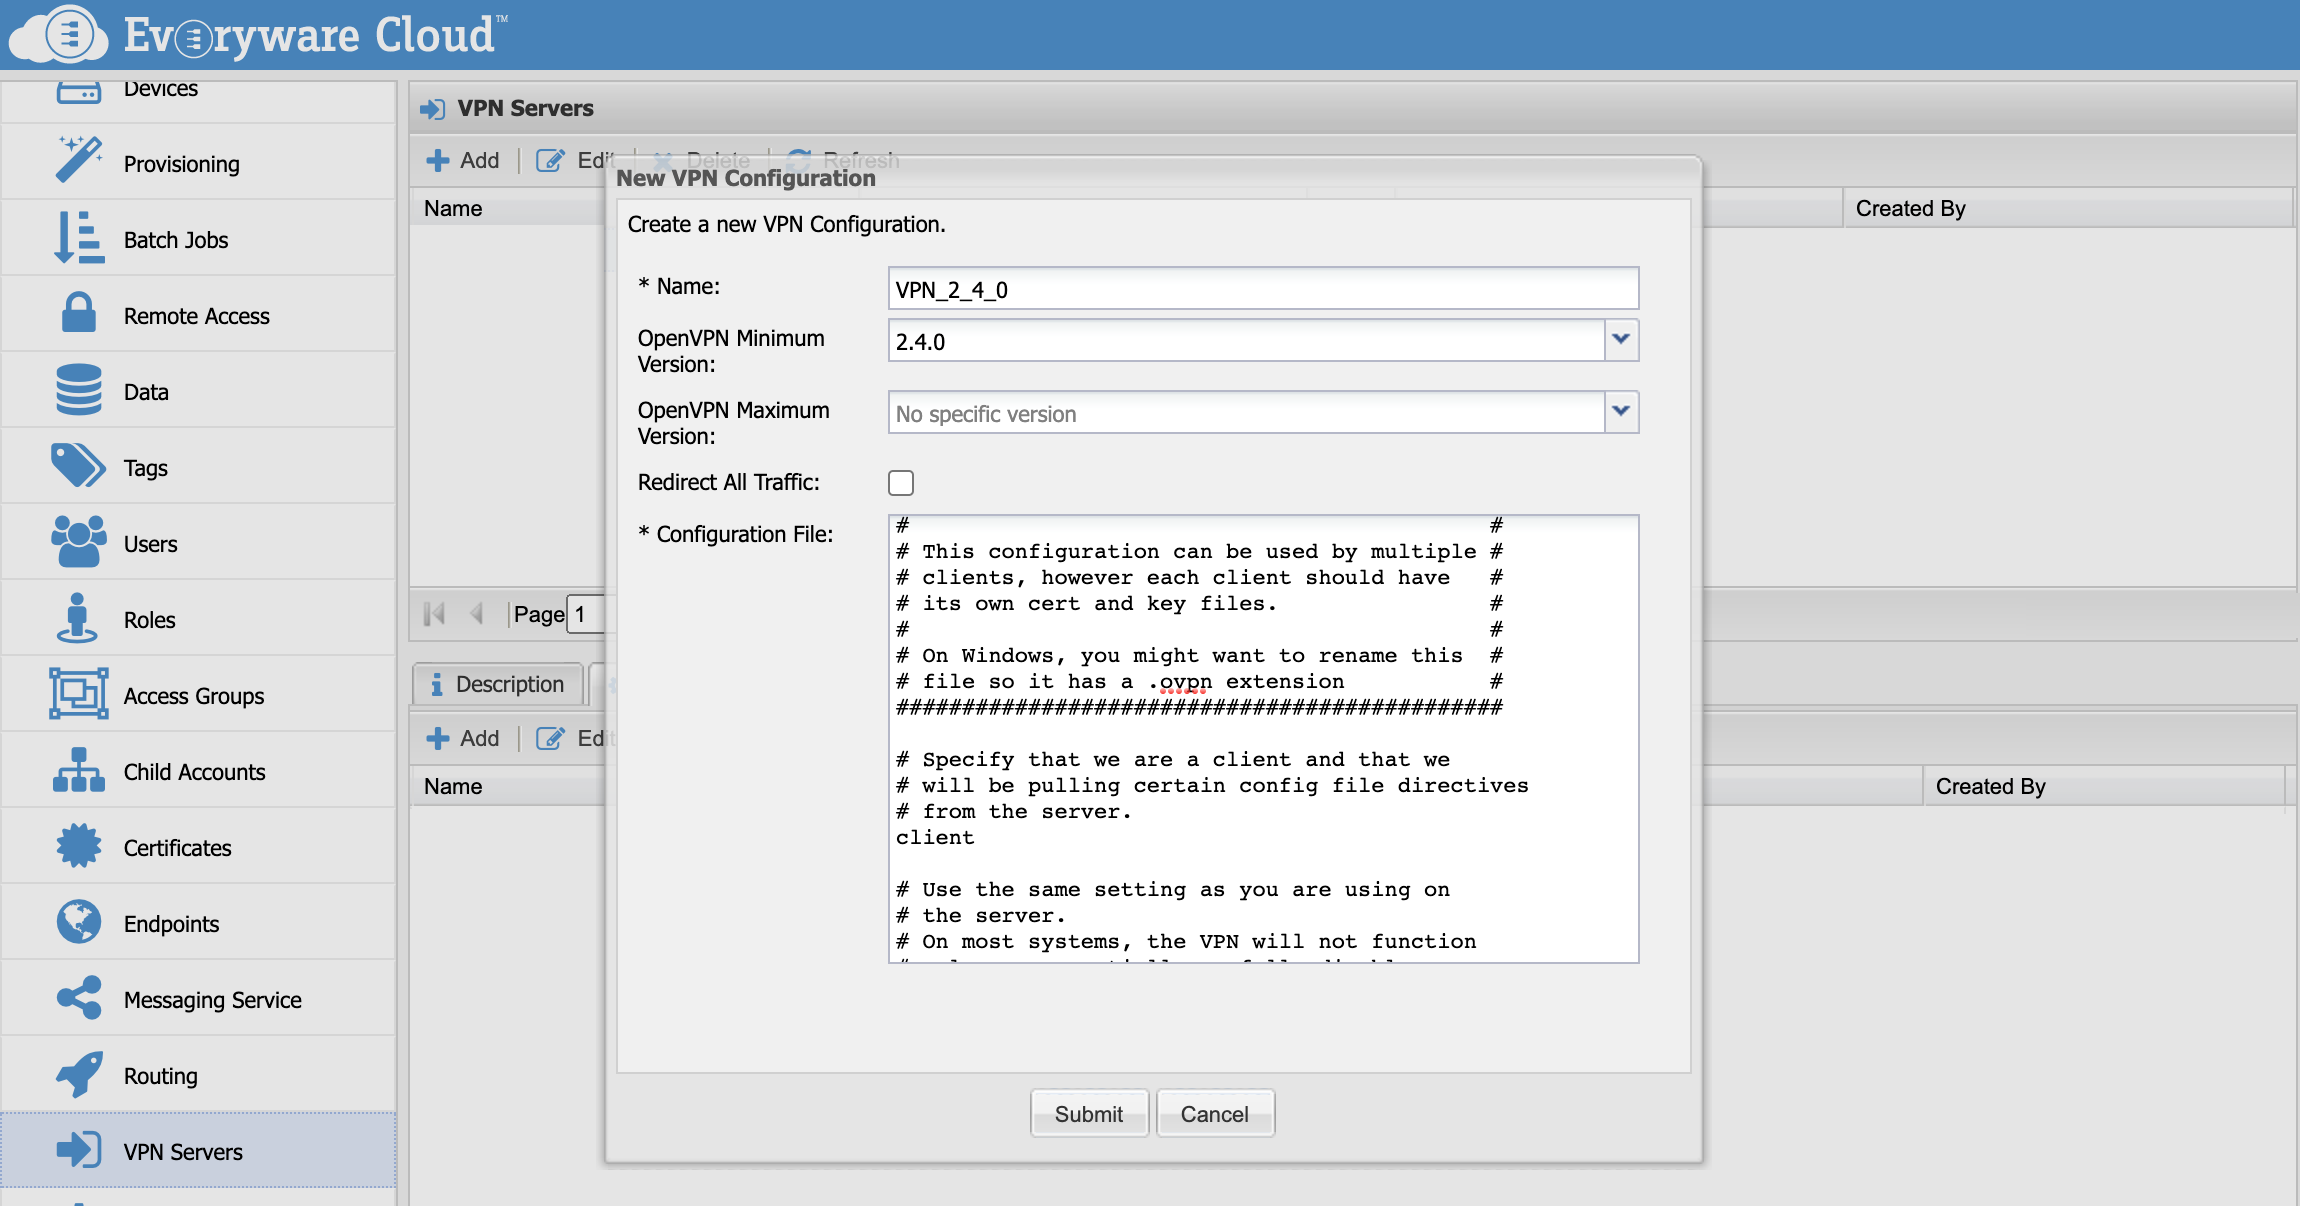
Add the configuration files that will be used for the on-demand VPN connections to the Remote Access Service.

The following table explains the various parameters present in the panel.
| Name | The name of the configuration. |
| OpenVPN Min Version | The minimum version the configuration is compatible with. This is used by ESF VPNv2 service to fetch the right configuration depending on the version of OpenVPN available. It can be left empty. |
| OpenVPN Max Version | The maximum version the configuration is compatible with. This is used by ESF VPNv2 service to fetch the right configuration depending on the version of OpenVPN available. It can be left empty. |
| Redirect All Traffic | This flag tells the configuration will change the routing of the client to redirect all traffic via the VPN connection. |
| Configuration File | The actual configuration file for the Remote Access Service. |
For the version parameters, It's important to avoid overlapping between multiple configurations as this values are used to decide which file to send to the devices when a new on-demand connection is requested. For example, if we have a configuration with Min Version set to 2.4 and Max Version to 2.6 we cannot have a second configuration with Min Version set to 2.4 and Max Version unset. The only exception is when setting the Redirect All Traffic flag. In this case it's possible to have an overlapping configurations.
The following three blocks contain valid configurations for OpenVPN 2.4+, OpenVPN 2.4+ with traffic redirect and OpenVPN 2.3.
##############################################
# Sample client-side OpenVPN 2.0 config file #
# for connecting to multi-client server.     #
#                                            #
# This configuration can be used by multiple #
# clients, however each client should have   #
# its own cert and key files.                #
#                                            #
# On Windows, you might want to rename this  #
# file so it has a .ovpn extension           #
##############################################

# Specify that we are a client and that we
# will be pulling certain config file directives
# from the server.
client

# Use the same setting as you are using on
# the server.
# On most systems, the VPN will not function
# unless you partially or fully disable
# the firewall for the TUN/TAP interface.
;dev tap
dev tun

# Windows needs the TAP-Win32 adapter name
# from the Network Connections panel
# if you have more than one.  On XP SP2,
# you may need to disable the firewall
# for the TAP adapter.
;dev-node MyTap

# Are we connecting to a TCP or
# UDP server?  Use the same setting as
# on the server.
;proto tcp
proto udp

# The hostname/IP and port of the server.
# You can have multiple remote entries
# to load balance between the servers.
remote PLACEHOLDER_VPN_HOST PLACEHOLDER_VPN_PORT

# Choose a random host from the remote
# list for load-balancing.  Otherwise
# try hosts in the order specified.
;remote-random

# Keep trying indefinitely to resolve the
# host name of the OpenVPN server.  Very useful
# on machines which are not permanently connected
# to the internet such as laptops.
resolv-retry infinite

# Most clients don't need to bind to
# a specific local port number.
nobind

# Downgrade privileges after initialization (non-Windows only)
;user nobody
;group nobody

# Try to preserve some state across restarts.
persist-key
persist-tun

# If you are connecting through an
# HTTP proxy to reach the actual OpenVPN
# server, put the proxy server/IP and
# port number here.  See the man page
# if your proxy server requires
# authentication.
;http-proxy-retry # retry on connection failures
;http-proxy [proxy server] [proxy port #]

# Wireless networks often produce a lot
# of duplicate packets.  Set this flag
# to silence duplicate packet warnings.
;mute-replay-warnings

# SSL/TLS parms.
# See the server config file for more
# description.  It's best to use
# a separate .crt/.key file pair
# for each client.  A single ca
# file can be used for all clients.
;ca ca.crt
;cert client.crt
;key client.key

# Verify server certificate by checking
# that the certicate has the nsCertType
# field set to "server".  This is an
# important precaution to protect against
# a potential attack discussed here:
#  http://openvpn.net/howto.html#mitm
#
# To use this feature, you will need to generate
# your server certificates with the nsCertType
# field set to "server".  The build-key-server
# script in the easy-rsa folder will do this.
;ns-cert-type server

# If a tls-auth key is used on the server
# then every client must also have the key.
;tls-auth ta.key 1

tls-cipher DHE-RSA-AES256-GCM-SHA384:DHE-RSA-AES256-SHA256:DHE-RSA-AES128-GCM-SHA256:DHE-RSA-AES128-SHA256:DHE-RSA-AES256-SHA:DHE-RSA-AES128-SHA:DHE-RSA-CAMELLIA-256-CBC-SHA:DHE-RSA-CAMELLIA-128-CBC-SHA:AES256-SHA:AES128-SHA

verify-x509-name "PLACEHOLDER_CERT_SUBJECT"

# Select a cryptographic cipher.
# If the cipher option is used on the server
# then you must also specify it here.
cipher AES-128-CBC

auth SHA256

# Enable compression on the VPN link.
# Don't enable this unless it is also
# enabled in the server config file.
comp-lzo

# Set log file verbosity.
verb 3

# Silence repeating messages
;mute 20

# Everyware Cloud Security
auth-user-pass

# Disable key renegotiation
reneg-sec 0

# Everyware Cloud Network Configuration
inactive 300
ping 10
ping-exit 60

# Notify disconnect to server (UDP)
explicit-exit-notify 1

<ca>
PLACEHOLDER_CA_CHAIN
</ca>
##############################################
# Sample client-side OpenVPN 2.0 config file #
# for connecting to multi-client server.     #
#                                            #
# This configuration can be used by multiple #
# clients, however each client should have   #
# its own cert and key files.                #
#                                            #
# On Windows, you might want to rename this  #
# file so it has a .ovpn extension           #
##############################################

# Specify that we are a client and that we
# will be pulling certain config file directives
# from the server.
client

# Use the same setting as you are using on
# the server.
# On most systems, the VPN will not function
# unless you partially or fully disable
# the firewall for the TUN/TAP interface.
;dev tap
dev tun

# Windows needs the TAP-Win32 adapter name
# from the Network Connections panel
# if you have more than one.  On XP SP2,
# you may need to disable the firewall
# for the TAP adapter.
;dev-node MyTap

# Are we connecting to a TCP or
# UDP server?  Use the same setting as
# on the server.
;proto tcp
proto udp

# The hostname/IP and port of the server.
# You can have multiple remote entries
# to load balance between the servers.
remote PLACEHOLDER_VPN_HOST PLACEHOLDER_VPN_PORT

# Choose a random host from the remote
# list for load-balancing.  Otherwise
# try hosts in the order specified.
;remote-random

# Keep trying indefinitely to resolve the
# host name of the OpenVPN server.  Very useful
# on machines which are not permanently connected
# to the internet such as laptops.
resolv-retry infinite

# Most clients don't need to bind to
# a specific local port number.
nobind

# Downgrade privileges after initialization (non-Windows only)
;user nobody
;group nobody

# Try to preserve some state across restarts.
persist-key
persist-tun

# If you are connecting through an
# HTTP proxy to reach the actual OpenVPN
# server, put the proxy server/IP and
# port number here.  See the man page
# if your proxy server requires
# authentication.
;http-proxy-retry # retry on connection failures
;http-proxy [proxy server] [proxy port #]

# Wireless networks often produce a lot
# of duplicate packets.  Set this flag
# to silence duplicate packet warnings.
;mute-replay-warnings

# SSL/TLS parms.
# See the server config file for more
# description.  It's best to use
# a separate .crt/.key file pair
# for each client.  A single ca
# file can be used for all clients.
;ca ca.crt
;cert client.crt
;key client.key

# Verify server certificate by checking
# that the certicate has the nsCertType
# field set to "server".  This is an
# important precaution to protect against
# a potential attack discussed here:
#  http://openvpn.net/howto.html#mitm
#
# To use this feature, you will need to generate
# your server certificates with the nsCertType
# field set to "server".  The build-key-server
# script in the easy-rsa folder will do this.
;ns-cert-type server

# If a tls-auth key is used on the server
# then every client must also have the key.
;tls-auth ta.key 1

tls-cipher DHE-RSA-AES256-GCM-SHA384:DHE-RSA-AES256-SHA256:DHE-RSA-AES128-GCM-SHA256:DHE-RSA-AES128-SHA256:DHE-RSA-AES256-SHA:DHE-RSA-AES128-SHA:DHE-RSA-CAMELLIA-256-CBC-SHA:DHE-RSA-CAMELLIA-128-CBC-SHA:AES256-SHA:AES128-SHA

verify-x509-name "PLACEHOLDER_CERT_SUBJECT"

# Select a cryptographic cipher.
# If the cipher option is used on the server
# then you must also specify it here.
cipher AES-128-CBC

auth SHA256

# Enable compression on the VPN link.
# Don't enable this unless it is also
# enabled in the server config file.
comp-lzo

# Set log file verbosity.
verb 3

# Silence repeating messages
;mute 20

# Everyware Cloud Security
auth-user-pass

# Disable key renegotiation
reneg-sec 0

# Everyware Cloud Network Configuration
inactive 300
ping 10
ping-exit 60

# Route all the client traffic through the VPN
redirect-gateway def1

# Notify disconnect to server (UDP)
explicit-exit-notify 1

<ca>
PLACEHOLDER_CA_CHAIN
</ca>
##############################################
# Sample client-side OpenVPN 2.0 config file #
# for connecting to multi-client server.     #
#                                            #
# This configuration can be used by multiple #
# clients, however each client should have   #
# its own cert and key files.                #
#                                            #
# On Windows, you might want to rename this  #
# file so it has a .ovpn extension           #
##############################################

# Specify that we are a client and that we
# will be pulling certain config file directives
# from the server.
client

# Use the same setting as you are using on
# the server.
# On most systems, the VPN will not function
# unless you partially or fully disable
# the firewall for the TUN/TAP interface.
;dev tap
dev tun

# Windows needs the TAP-Win32 adapter name
# from the Network Connections panel
# if you have more than one.  On XP SP2,
# you may need to disable the firewall
# for the TAP adapter.
;dev-node MyTap

# Are we connecting to a TCP or
# UDP server?  Use the same setting as
# on the server.
;proto tcp
proto udp

# The hostname/IP and port of the server.
# You can have multiple remote entries
# to load balance between the servers.
remote PLACEHOLDER_VPN_HOST PLACEHOLDER_VPN_PORT

# Choose a random host from the remote
# list for load-balancing.  Otherwise
# try hosts in the order specified.
;remote-random

# Keep trying indefinitely to resolve the
# host name of the OpenVPN server.  Very useful
# on machines which are not permanently connected
# to the internet such as laptops.
resolv-retry infinite

# Most clients don't need to bind to
# a specific local port number.
nobind

# Downgrade privileges after initialization (non-Windows only)
;user nobody
;group nobody

# Try to preserve some state across restarts.
persist-key
persist-tun

# If you are connecting through an
# HTTP proxy to reach the actual OpenVPN
# server, put the proxy server/IP and
# port number here.  See the man page
# if your proxy server requires
# authentication.
;http-proxy-retry # retry on connection failures
;http-proxy [proxy server] [proxy port #]

# Wireless networks often produce a lot
# of duplicate packets.  Set this flag
# to silence duplicate packet warnings.
;mute-replay-warnings

# SSL/TLS parms.
# See the server config file for more
# description.  It's best to use
# a separate .crt/.key file pair
# for each client.  A single ca
# file can be used for all clients.
;ca ca.crt
;cert client.crt
;key client.key

# Verify server certificate by checking
# that the certicate has the nsCertType
# field set to "server".  This is an
# important precaution to protect against
# a potential attack discussed here:
#  http://openvpn.net/howto.html#mitm
#
# To use this feature, you will need to generate
# your server certificates with the nsCertType
# field set to "server".  The build-key-server
# script in the easy-rsa folder will do this.
;ns-cert-type server

# If a tls-auth key is used on the server
# then every client must also have the key.
;tls-auth ta.key 1

tls-cipher DHE-RSA-AES256-GCM-SHA384:DHE-RSA-AES256-SHA256:DHE-RSA-AES128-GCM-SHA256:DHE-RSA-AES128-SHA256:DHE-RSA-AES256-SHA:DHE-RSA-AES128-SHA:DHE-RSA-CAMELLIA-256-CBC-SHA:DHE-RSA-CAMELLIA-128-CBC-SHA:AES256-SHA:AES128-SHA

tls-remote "PLACEHOLDER_CERT_SUBJECT"

# Select a cryptographic cipher.
# If the cipher option is used on the server
# then you must also specify it here.
cipher AES-128-CBC

auth SHA256

# Enable compression on the VPN link.
# Don't enable this unless it is also
# enabled in the server config file.
comp-lzo

# Set log file verbosity.
verb 3

# Silence repeating messages
;mute 20

# Everyware Cloud Security
auth-user-pass

# Disable key renegotiation
reneg-sec 0

# Everyware Cloud Network Configuration
inactive 300
ping 10
ping-exit 60

# Notify disconnect to server (UDP)
explicit-exit-notify 1

<ca>
PLACEHOLDER_CA_CHAIN
</ca>
The three templates contain various placeholders that need to be replaced in order to have working configurations. These placeholders are listed in the following table.
| PLACEHOLDER_VPN_HOST | The address of the VPN server as specified in the VPN server entry. |
| PLACEHOLDER_VPN_PORT | The port of the VPN server as specified in the VPN server entry |
| PLACEHOLDER_CA_CHAIN | The PEM formatted CA chain certificates, of which your certificate is the leaf |
| PLACEHOLDER_CERT_SUBJECT | The subject of your certificate. For example C=XX, ST=YY, L=ZZZ ZZZ, O=Example Company, CN=*.example.com. Note that for the OpenVPN 2.3 configurations this property need to be rewritten in the following format: /C=XX/ST=YY/L=ZZZ_ZZZ/O=Example_Company/CN=_.example.com |
Once a service is correctly configured, in order to use it, it's necessary to configure account access. This is described on the Remote Access Service section of this documentation.
Assign an Account
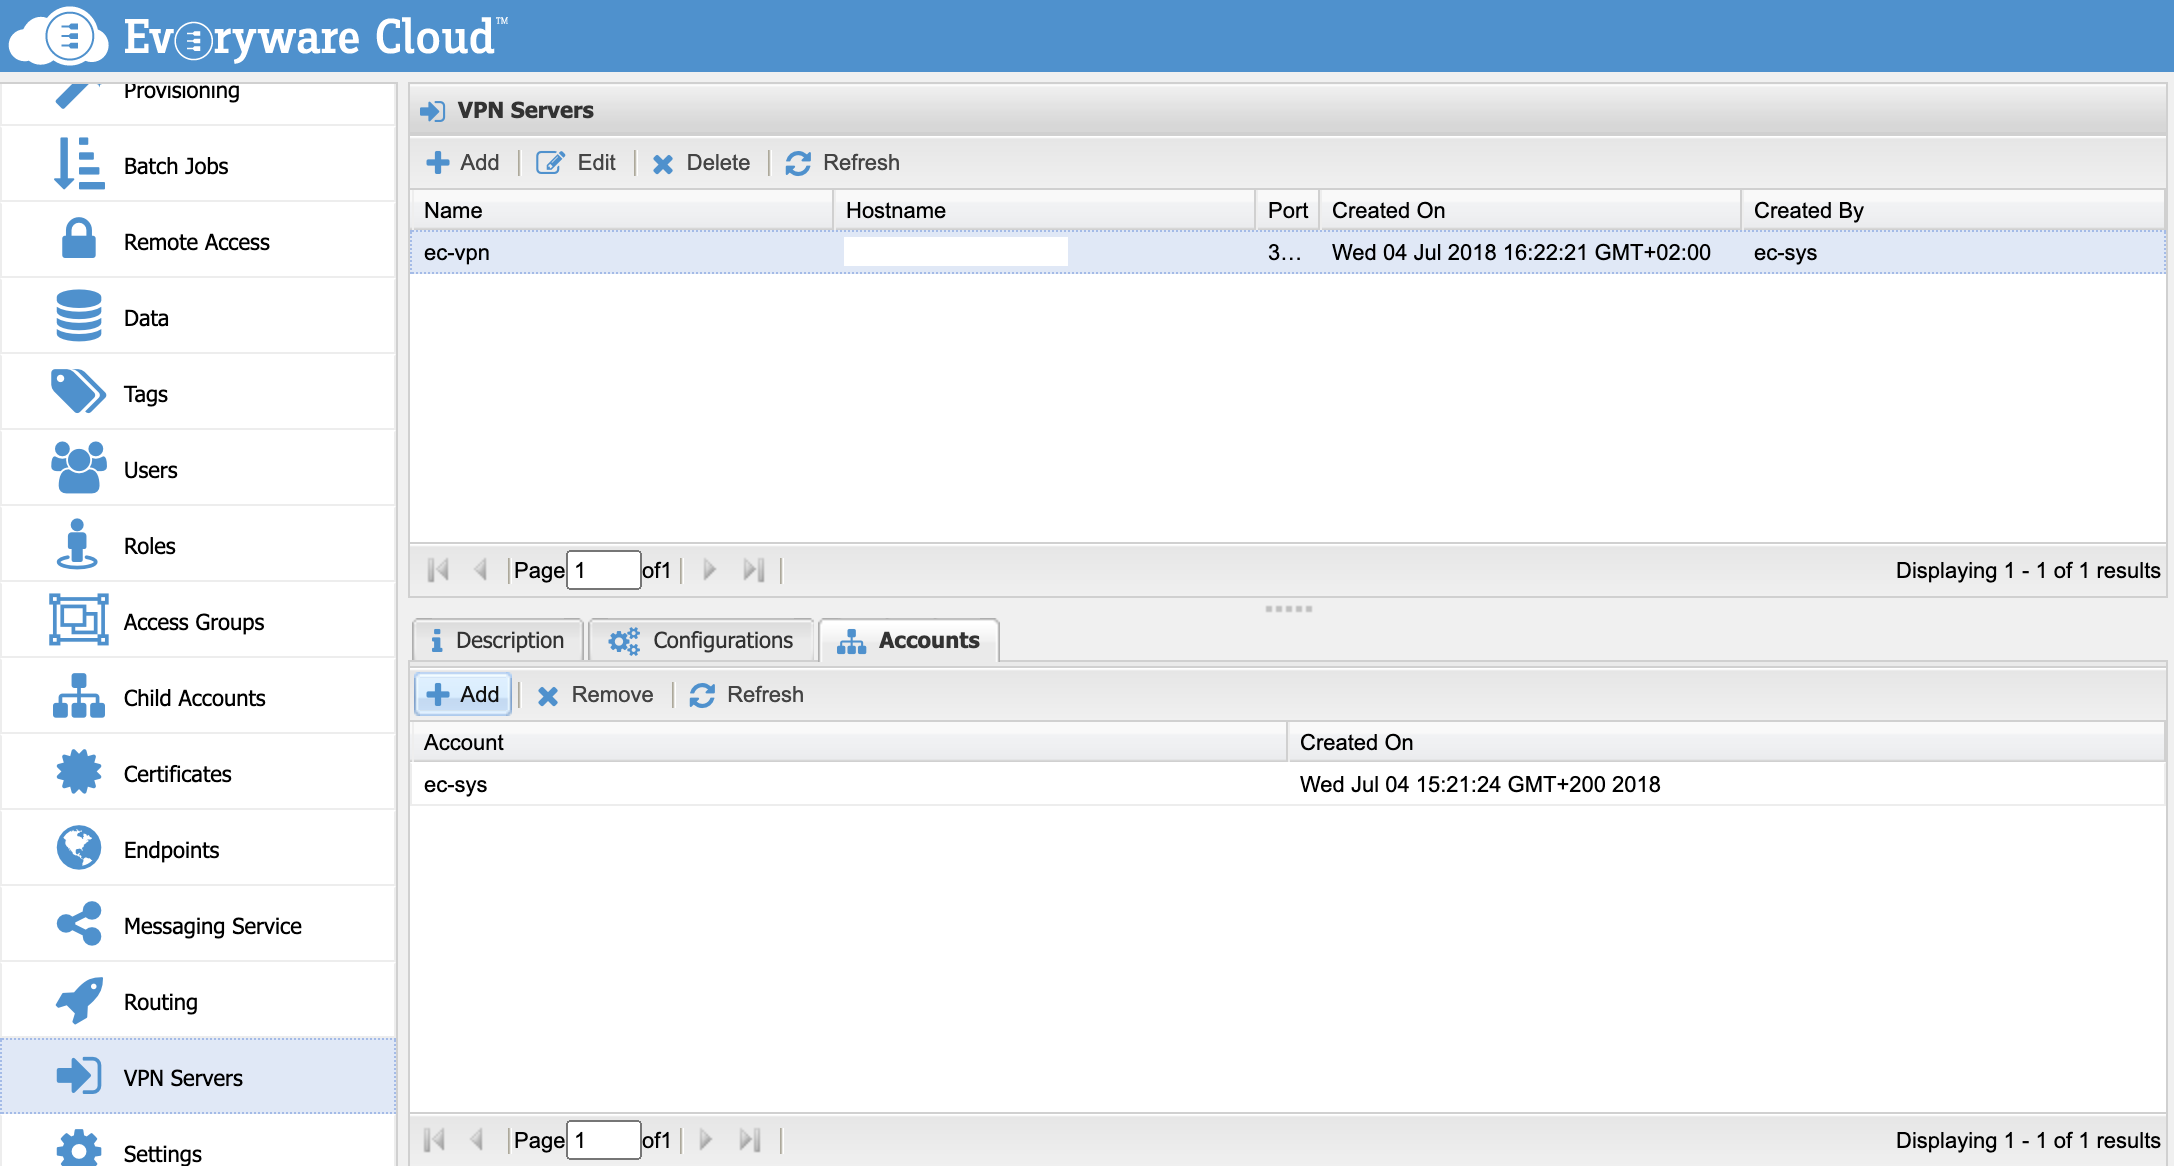
After creating a new first level account named new-account:
- Connect to the admin console using an ec-sys account administrator user
- Select VPN Servers on the left menu
- Select the server entry you want to assign in the VPN Servers table
- Select the Accounts tab in the lower part of the screen
- Click on the Add button
- Select new-account
- Submit

Un-assign an Account
An account can be unassigned following these steps:
- Connect to the admin console using an ec-sys account administrator user
- Select the VPN Servers on the left menu
- Select the server entry you want to change in the VPN Servers table
- Select the Accounts tab in the lower part of the screen
- Select the child account you want to remove
- Click on Remove button
- Submit
While an account is in unassigned state its devices cannot establish connections through the VPN Service.
Updated almost 2 years ago
